相信很多开发者都听过 E2E Testing,我有幸在两个项目中负责了 E2E Testing 的搭建和维护。这里分享一下如何 E2E Testing。
1. 什么是 E2E Testing?
笔者认为:E2E Testing 就是从用户角度对软件进行测试。
例如:进入“登陆界面”,输入用户名和密码,点击登陆后跳转到“登陆成功”界面。
2. 如何做 E2E Testing?
很幸运,在 E2E Testing 方面,已经有很多开源软件可以使用。 推荐 Cypress
1. 安装并配置 Cypress
yarn add cypress --dev

yarn cypress open
第一次运行 cypress open,Cypress 会自动生成测试目录和基本配置。如:
├── cypress
│   └── fixtures
│   └── integration
│   └── plugins
│   └── support
2. 编写一个登陆界面,并测试
我们约定路由如下:
/login登陆界面/主页面
// 登陆界面
// src/modules/login/index.js
import React, { useState } from "react"
import { navigate } from "@reach/router"

export default function Login() {
  const [username, setUsername] = useState("")
  const [password, setPassword] = useState("")

  return (
    <div>
      <div>
        <label htmlFor="username">Username:</label>
        <input
          type="text"
          id="username"
          name="username"
          value={username}
          onChange={e => setUsername(e.target.value)}
        />
      </div>

      <div>
        <label htmlFor="password">Password:</label>
        <input
          type="password"
          id="password"
          name="password"
          value={password}
          onChange={e => setPassword(e.target.value)}
        />
      </div>

      <button
        type="submit"
        onClick={() => {
          if (username === "jifa" && password === "password") {
            navigate("/")
          }
        }}
      >
        Login
      </button>
    </div>
  )
}
// 测试代码
// cypress/integration/login.js
/// <reference types="Cypress" />
describe("Login Page", function() {
before(function() {
cy.fixture("user").as("user")
})
it("fill username and password, login", function() {
cy.visit("/login")
cy.get('input[name="username"]').type(this.user.username)
cy.get('input[name="password"]').type(this.user.password)
cy.get('button[type="submit"]').click()
cy.contains("HOME")
})
})// 测试数据
// cypress/fixtures/user.json
{
"username": "jifa",
"password": "password"
}运行测试
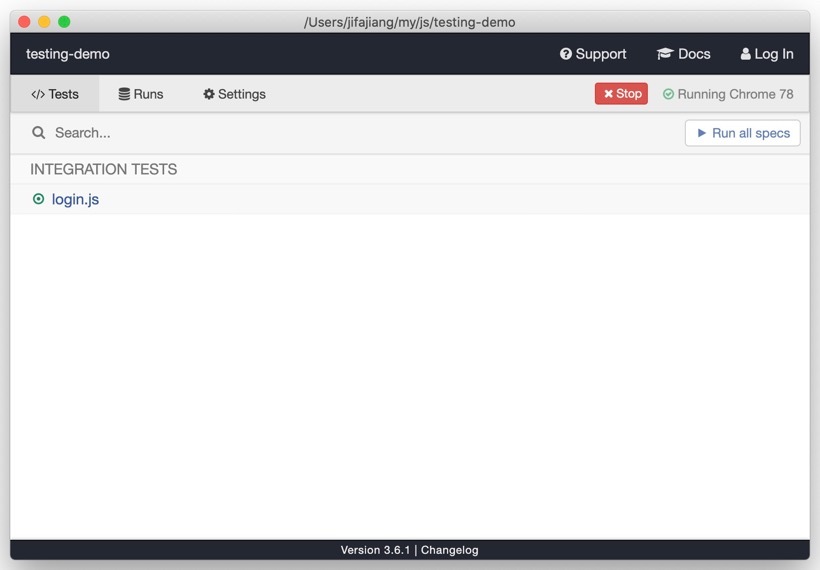
yarn cypress open这时 Cypress 会启动如下窗口,点击测试文件即可开始测试。

3. 常见问题
1. 如何自动补全 Cypress 方法?
在测试文件内添加如下代码:
/// <reference types="Cypress" />2. cy undefined,如何解决?
安装 [eslint-plugin-cypress](https://github.com/cypress-io/eslint-plugin-cypress),并配置 eslintrc.json
yarn add --dev eslint-plugin-cypress// eslintrc.json
{
"plugins": ["cypress"]
}3. 如何自动化测试?
以 GitHub Actions 为例:
第一步:定义 npm scripts
// package.json
"scripts": {
  "start": "react-scripts start",

  "start-server": "npm start",
  "cy:record": "cypress run --record",
  "cy:ci": "start-server-and-test start-server http://localhost:3000 cy:record"
}
第二步: 定义 .github/workflows/pull_request.yml
name: "PR Checks"

on: pull_request

jobs:
  test:
    name: E2E Tests
    runs-on: ubuntu-latest
    steps:
      - name: Check out code
        uses: actions/checkout@master

      - name: Install dependencies
        run: yarn install --non-interactive --no-progress --frozen-lockfile --ignore-optional

      - name: E2E Tests
        run: yarn cy:ci
        env:
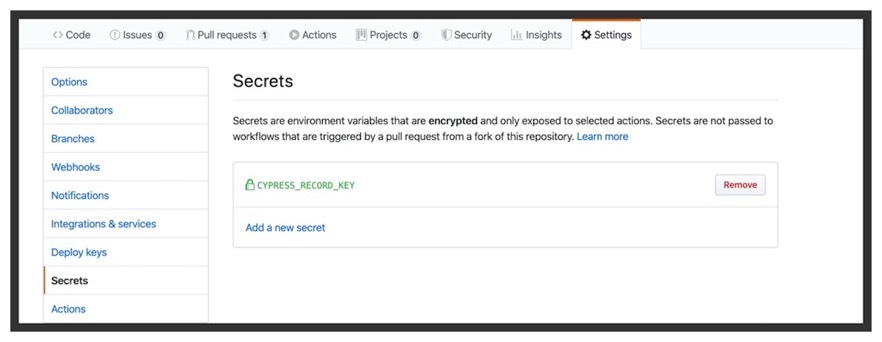
          CYPRESS_RECORD_KEY: ${{ secrets.CYPRESS_RECORD_KEY }}
需要在 GitHub Secrets 定义 CYPRESS_RECORD_KEY,如下:

经验
其实可以全局安装 Cypress
优点是缩短 npm 安装时间。
代码:https://github.com/ThaddeusJiang/react-testing-example/pull/2
refs: